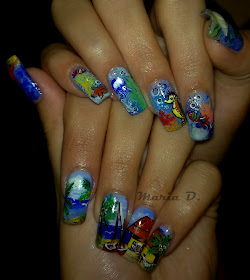
Acest design este unul mai deosebit si incarcat deoarece l-am realizat pentru un concurs cu tema ‘’Summer dream’’. Din pacate, acest concurs nu a mai avut loc, din cauza numarului insuficient de participanti.Cu toate acestea, m-am totarat sa va prezint si un step-by-step al acestui model.
Sper sa va placa.
This design is more exquisit because I realized it for a nail competition with the theme : ‘’ Summer dream’’. Regrettable, this competition didn’t took place, because of the reduced number of participants. However, I decided to show you the step-by-step of this design .
Hope you enjoy it!
Pasul 1: Pregatiti unghia naturala : Dezinfectare – Degresare prin pilire – Inlaturati praful – Aplicati primer.
Step 1 : Prepare the natural nail : Dezinfect – File the natural nail – Clean the dust – Apply primer.
Pasul 2 : Aplicati gelul de baza. Uscati-l in lampa UV. Degresati cu cleaner. Matuiti.
Step 2 : Apply base gel . Cure in UV lamp. Wipe with cleanser. File gently.
Pasul 3 : Pictati fundalul. Dupa fiecare strat, lasati-l sa se usuce.
Step 3 : Paint the background. After each layer, take a moment for the paint to dry.
Pasul 4 : Pictati elementele principale ale designului. In acest caz : casa.
Step 4 : Paint the main components of the design . In my case : the house.
Pasul 5 : Trecem la cealalta mana ; Fundalul il realizam din vopsea acrilica pe care o aplicam cu ajutorul unui buretel. Lasati vopseaua sa se usuce .
Pasul 6 : Modelati elementele din acryl (monomer + polimer ) precum : coralii, scoicile, stele de mare, etc. Aplicati scoici pisate pe langa acestea.
Step 5 : We take care of the other hand : we realise the background with acrylic paint applied with a sponge. Let the paint dry.
Step 6 : Create the elements with acryl (monomer + polimer ) like : the corals, the shells, the sea stars, etc. Apply little pieces of shells between the acryl elements.
Pasul 7 : Acum, ca vopseaua s-a uscat (la ambele maini) aplicati gelul de constructie .
Uscati in lampa UV . Stergeti cu cleanser si matuiti.
Step 7 : Now, when the paint dryed on both hands, apply the construction gel. Cure in UV lamp.
Wipe with cleanser and file gently with a buffer.
Pasul 8 : Pictati si restul de elemente – in cazul nostru : animalute marine.
Step 8 : Paint the rest of elements – in our case : the marine animals .
Pasul 9 : Realizati detaliile la mana cu peisajul . Pictati detaliile casei, palmierii, barcuta, hamacul.
Step 9 : Realize the detalis on the other hand with the landscape . Paint the details of the house, the palmtrees, the boat, the hammock.
Pasul 10 : La degetele mari creeati accente peste elementele in-lay din acryl si pictati si cateva alge.
Step 10 : For the thumbs, create accents over the in-lay elements and paint a few sea plants.
Pasul 11 : Dupa uscare, aplicati finish gel. Uscati in lampa UV . Aplicati ulei de cuticule si eventual o crema hidratanta de maini.
Step 11 : After the paint dries, apply finish gel. Cure in UV lamp. Apply cuticule oil and eventually – a hand cream .
Rezultatul final / Final result:


Bravo Maria sunt superbe!!!
RăspundețiȘtergere