joi, 7 octombrie 2010

STEP-BY-STEP: The Story of Flowers

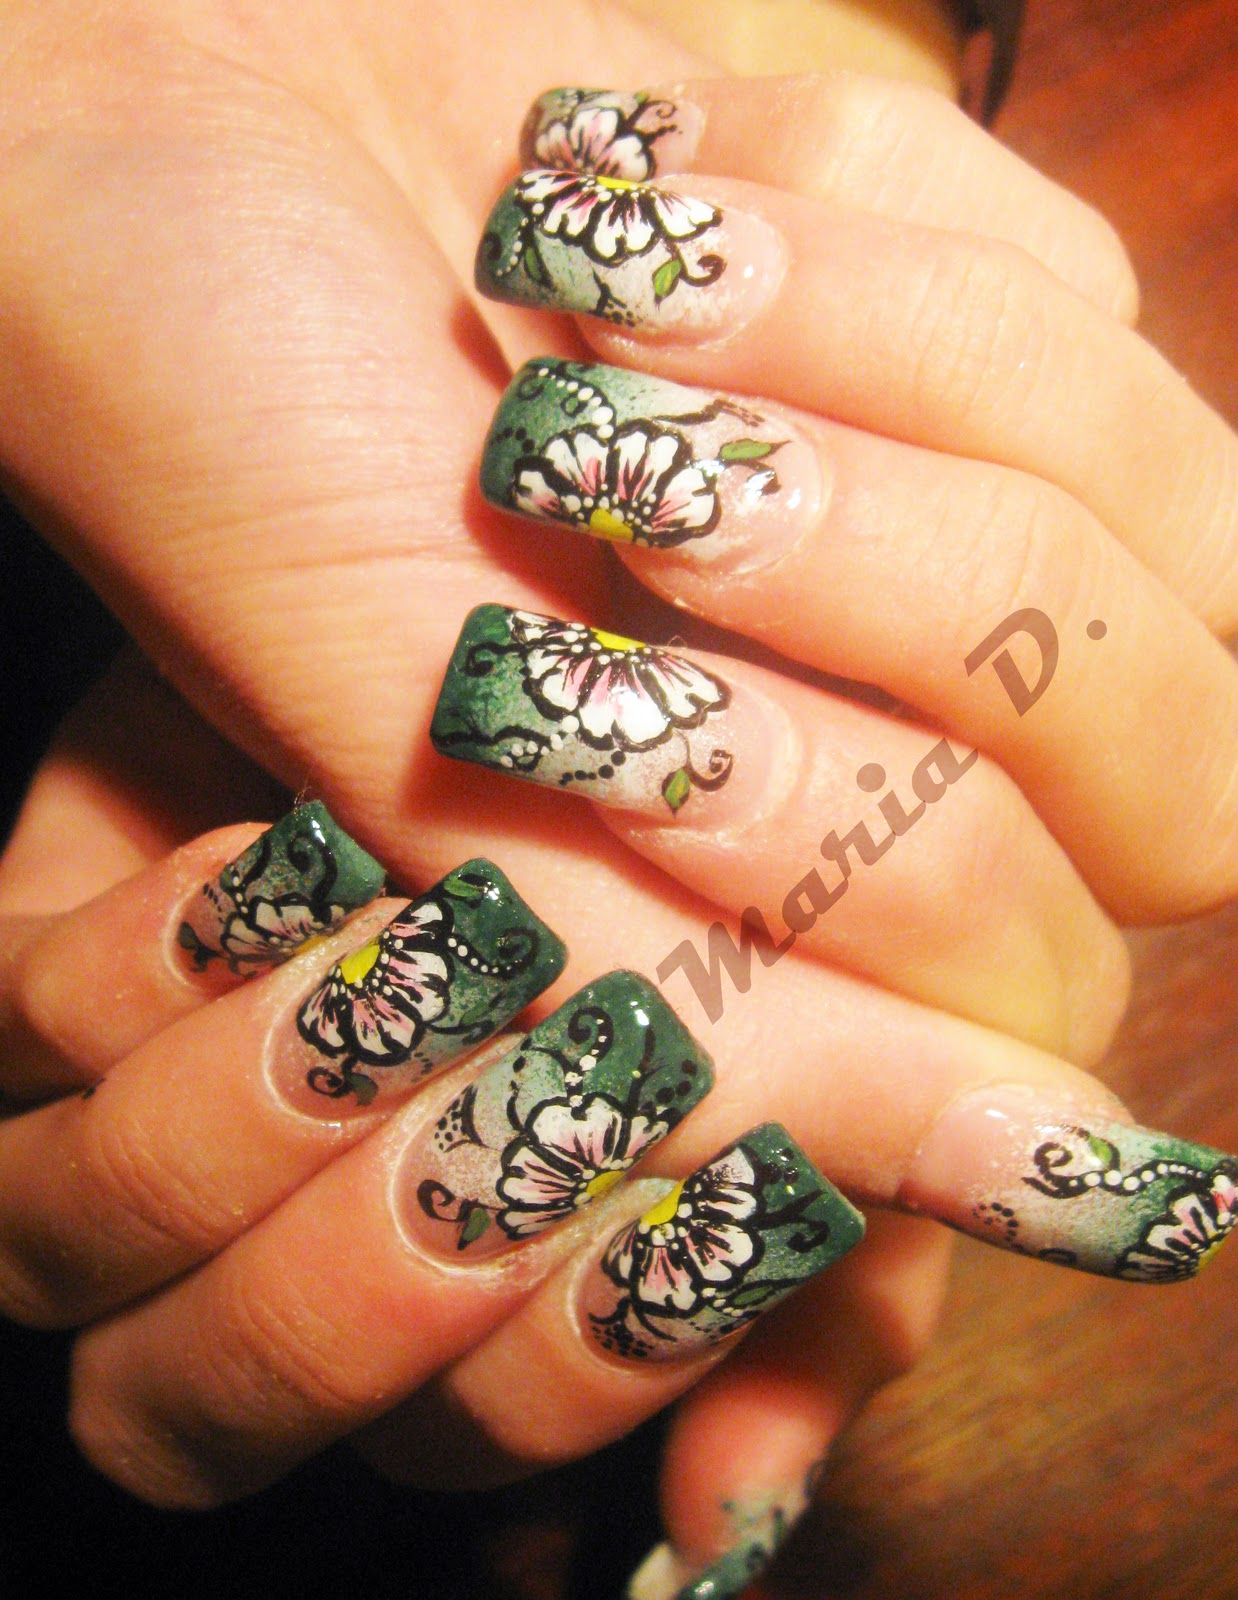
Va voi prezenta un nou design : pictura in poveste(doua unghii formeaza o floare) cu vopsele acrilice pe baza de apa si tehnica fundalului ''nins''.
I will present you a new design : painting in-story (2 nails form a flower) with acrylic painting water-based and the technique of ''snowy'' background.


Pasul 1 : Pregatiti unghiile - aplicati gelul de baza si gelul de constructie. Matuiti cu un buffer.
Step 1: Prepare the nails - apply base gel and construction gel. File it with a buffer.


Pasul 2: Se ia un buretel si se inmoaie in vopseaua acrilica alba . Tamponati usor unghia si asteptati sa se usuce. Utilizati aceeasi tehnica pentru colorarea intregii unghii. La mijloc folositi un verde mai deschis si unul mai inchis spre varf. Veti observa cum unghia capata o anumita profunzime.

Step 2: Take a sponge and dip it into white acrylic paint. Pat gently on the nail and wait to dry. Use the same technique for the entire nail. For the middle, use a lighter green and for the tip of the nail use a dark green. Observe how the nail gets a certain depth.


Pasul 3 : Formati petalele florilor avand grija ca atunci cand uniti unghiile (unghia din stanga cu unghia din dreapta ) sa se creeze o floare.
Step 3 : Create the petals of the flowers. Take care when you close your left nail to the right nail to create a flower.


Pasul 4 : In interiorul petalelor trageti cateva dungulite cu vopsea acrilica roz, creati mijlocul de polen al florii si conturati petalele fin cu negru.
Step 4 : In the interior of the petals draw a few pink lines, create the middle of pollen and contour the petals with a fine line.


 Pasul 5: Conturati cu negru si in interiorul petalelor.
Step 5 : Contour with black in the middle of the petals.


Pasul 6: Realizati carcei si conturul unor mici frunzulite. Aplicati punctulete albe in jurul bobului de polen.
Step 6: Draw abstract leaves. Apply fine dots around the pollen cercle.


Pasul 7 : Umpleti frunzulitele cu vopsea verde si realizati cu dots tool puncte albe pe carcei.
Step 7 : Fill the leaves with green paint and do white dots with dots tool.


Asteptati cateva minute pentru a se usca vopseaua....

Aplicati finish gel si uscati in lampa UV. Hidratati cuticulele cu ulei.
Take some moments for the paint to dry.....
Apply finish gel and cure in UV lamp. Hidratate the cuticules with oil.


Et...Voila...


luni, 4 octombrie 2010

STEP-BY-STEP: Intretinere - Inlay Design - Aquarium


Asa aratau unghiile inainte de intretinere.
These is how the nails look like before the periodic maintanance.


Modelul pe care urmeaza sa il prezint este unul vechi, inainte sa fac cursul de perfectionare - Design cu Acryl Color 3D, asa ca florile de acryl nu sunt cele mai reusite.
The following design I will present it is kind of old, before I took my course of Design with Acrylic Powder 3D, so the acryl flowers are not the best ones.


 Pasul 1: Dezinfectam mainile si incepem sa pilim. Mare atentie sa nu atingeti cu freza unghia naturala - piliti-o doar cu pila de granulatie 180.
Pasul 2 : Aplicam primer.
Step 1: Desinfect the hands and start filing. Be carefur not to touch the natural nail with your polizor - file just with the normal file with granulation of 180.
Step 2 : Apply primer.


Pasul 3 : Aplicam gelul de baza - il uscam in lampa UV.
Pasul 4 : Aplicam cover gel - il uscam in lampa UV.
Step 3 : Apply base gel - cure in UV lamp.
Step 4 : Apply cover gel - cure in UV lamp.


Pasul 5 : Matuiti gelul cu un buffer / pila 180 sau 240.
Step 5 : File the gel with a buffer of a file 180 or 240.


Pasul 6 : Cu ajutorul unui buretel aplicam vopseaua acrilica prin tamponare.
Asteptam sa se usuce foarte bine.
Step 6 : Apply the acrilic paint with a sponge . Take a moment for the paint to dry.


Pasul 7 : Realizam florile 3D din acryl (monomer si polimer). Acestea trebuie sa fie subtiri si foarte joase. Realizam accente in mijlocul florilor cu vopsea acrilica, dupa care aplicam perlute si cristale.
Step 7 : We make the 3D acrilic flowers (from monomer and polimer). Those must be thin and very low.
In the middle of petals realize accents with acrilic paint. Apply pearls and cristals.


Pasul 8 : Aplicam gelul de constructie si il uscam in lampa UV.
  Step 8 : Apply construction gel - cure in UV lamp.


Pasul 9 : Matuiti gelul cu un buffer / pila 180 sau 240.
Step 9 : File the gel with a buffer of a file 180 or 240.


Pasul 10 : Pictam cu vopsea acrilica frunzulitele (cu pensula subtire nr.2) si aplicam punctele cu dots tool.Asteptam sa se usuce vopseaua.
Step 10 : Paint with acrilic colors the leaves (using a small brush no.2 ) and apply the dots with dots tool. Take a moment for the paint to dry.


Pasul 11 : Aplicam finish gel si uscam in lampa UV. Aplicati ulei de cuticule si masati usor.
 Step 11: Apply finish gel and cure in UV lamp. Apply cuticle oil and masage gently.


 Rezultatul:
 Final result:


luni, 27 septembrie 2010

STEP-BY-STEP: Practice - gel design on Stiletto

 In continuare voi prezenta un design abstract pe un deget (hidos) de practica. Ideea este sa intelegeti cum sa aplica in mod corect gelurile si aplicatiile fara sa se combine sau sa se crape.

Next, I will present an abstract design on ( an ugly ) a practice finger . The idea is for you to understand how you have to apply properly the gels and aplications whitout combing or cracking.


Pasul 1 : Construirea unghiei cu gel de constructie clear. Aplicam si uscam la lampa.
Step 1 : The construction of the nail with clear construction gel. Apply and cure in  UV lamp.


Pasul 2 : Aplicam un strat de gel cover natural si uscam in lampa UV.

Step 2 : Apply a layer of natural cover gel and cure in UV lamp.


Pasul 3 : Indepartam sablonul, stergem unghia cu cleanser, pilim si nivelam pentru a obtine forma ideala.

Step 3 : Remove the stencil , wipe with cleaner and start filing to level the gel and to obtain the perfect shape.


Pasul 4 : Alegem nuanta de gel pe care il aplicam intr-o forma abstracta. Aplicam un strat subtire de gel clear si asezam foita de aur pe varful unghiei (vezi nr. 2). 
Aplicam si un strat subtire de gel auriu si uscam in lampa UV.

Step 4 : Choose the color of the gel and apply it into an abstract shape. Apply a thin layer of UV gel on the tip of the nail and put the golden foil on it (see no.2).
Apply a thin layer of golen gel and cure in UV lamp.


Pasul 5 : Stergem cu cleaner filmul de dispersie si matuim usor cu bufferul. Aplicam vopseaua acrilica sub forma de linii cu pensula subtire, iar punctele le aplicam cu dots tool. 
Asteptam sa se usuce vopseaua.

Step 5 : Whipe the gel with cleaner and  file gently with a buffer. Apply the acrylic paint - lines with a thin brush and dots with dots tool. Wait for the painting to dry.


PAsul 6 : Aplicam cu lipici perle aurii intre punctele negre pictate anterior (foto 2). Aplicam si strasurile.
Dupa 30 de secunde aplicam finish gel si uscam in lampa UV.

Step 6 : Apply golden pearls with glue between the black dots we painted previously (foto 2). 
Apply rhinstones. After 30 seconds , apply a layer of finish gel and cure in UV lamp.

DONE!

STEP-BY-STEP: French and abstract painting

Today I will present you a step-by step of an oldest design of mine. Hope you`ll enjoy it!

Astazi va voi prezenta un step-by-step al unui design realizat acum ceva vreme. 
Ma gandesc ca toate sunt binevenite. Sper sa va placa.


These is how my client`s nails looked  before I applied the extensions.

Asa aratau unghiile clientei inaintea aplicarii extensiilor.


Step 1 : Preparing the natural nail: Dezinfection - Cutting/Shorting - Degreasing - Filing with 180 granulation file.

Pasul 1: Pregatirea unghiei naturale : Dezinfectare - Scurtare - Degresare -
Pilire cu pila de granulatie maxima 180.


 Step 2: Apply the tips carefully - without air bubbles .Shorten the tips - Mattify the tips - 
Realize the crossing between the natural nails and tips with the 180 file - Apply primer.

 Pasul 2: Aplicarea tipsurilor cu grija pentru a nu prinde aer.Se scurteaza si se matuiesc tipsurile . Se realizeaza trecerea de la tips la unghia naturala cu pila de 180.Se aplica primer.


 Step 3: Appling the base gel. Cure in UV lamp.
Step 4 : Appling cover gel natural. Cure in UV lamp.

Pasul 3:Se aplica gelul de baza se usuca in lampa UV.
Pasul 4 : Se aplica gelul cover natural si se usuca in lampa UV.


Step 6: Apply white gel and gently create de Smile Line :) . Cure in UV lamp.

Pasul 6: Se aplica gel alb si se formeaza linia smile :) cu grija. Se usuca in lampa UV.


Step 7: Appling construction gel .Cure in UV lamp.
Pasul 7: Se aplica gelul de constructie si se usuca in lampa UV.


 Step 8:  Degresing - Mattify.
Pasul 8:  Se degreseaza si se matuiesc unghiile.


Step 8: Paint the abstract lines with acrilyc paintings - Take a moment for the paint to dry.
Pasul 8:  Realizam pictura abstracta cu vopsele acrilice - Asteptam sa se usuce vopseaua.


  Step 9 : Apply finish gel and cure in UV lamp. 
Step 10 : Apply cuticle oil and - optional - a SPA treatment ( peeling, mask, hidratation - massage) because the client`s skin is very dehydratated and exfoliated.

 Pasul 9 : Se aplica finish gel ce se usuca in lampa UV.
Pasul 10 : Se aplica ulei de cuticule si - optional - un tratament SPA ( peeling, masca, hidratare, masaj) deoarece pielea clientei este extrem de deshidratata si uscata.


And the final result : 
Si rezultatul final : 


joi, 16 septembrie 2010

STEP-BY-STEP: Crystal nails and one-stroke flowers

Deoarece nu prea o sa mai prezint multe modele de unghii , voi incerca totusi sa ma ridic cat de cat la nivelul asteptarilor voastre si voi prezenta diferite step-by-step-uri si modele realizate pe tipsuri.

Acest step by step consta in aplicarea corecta a tipsurilor cu gel; modelul: french si pictura chinezeasca.
This step-by-step it`s about correct aplication of nail extensions with tips and gel; design : french and chinese painting.


-unghiile naturale - natural nails-


Pasul 1: Pregatirea unghiei naturale : Dezinfectare - Scurtare - Degresare -
Pilire cu pila de granulatie maxima 180.

Step 1: Preparing the natural nail: Dezinfection - Cutting/Shorting - Degreasing - Filing with 180 granulation file.
 
Pasul 2: Aplicarea tipsurilor cu grija pentru a nu prinde aer.

Step 2: Apply the tips carefully - without air bubbles .


Pasul 3: Se scurteaza si se matuiesc tipsurile - Se realizeaza trecerea de la tips la unghia naturala cu pila de 180.- Se aplica primer.

Step 3 : Shorting the tips - Mattify the tips - Realize the crossing between the natural nails and tips with the 180 file - Apply primer.

 
Pasul 4 : Se aplica gelul de baza se usuca in lampa UV.
Step 4: Appling the base gel. Cure in UV lamp.


Pasul 5 : Se aplica gelul cover natural si se usuca in lampa UV.
 
Step 5 : Appling cover gel natural. Cure in UV lamp.

 
Pasul 6 :  Se degreseaza cu cleaner - Se aplica gelurile glitter sub forma unui french si uscam la lampa UV - In cazul de fata am matuit cu bufferul si am aplicat acryl clear cu glitter negru,turqoise, cu scoici albastre si miniholograme argintii.

Step 6: Degreasing with cleaner - Appling glitter gel and applications like a french and cure in a UV Lamp.
In my case, I mattified the gel with a buffer and I applied clear acryl with black and tourqoise glitter, blue shells and silver miniholograms.


Pasul 7: Se aplica gelul de constructie - Se degreseaza si se matuiesc unghiile.
Step 7: Appling construction gel - Degresing - Mattify.


Pasul 8:  Realizam pictura cu vopsele acrilice - Asteptam sa se usuce vopseaua.

Step 8: Paint the flowers with acrilyc paintings - Take a moment for the painting to dry.

Pasul 9 : Se aplica finish gel.
Step 9 : Apply finish gel.


duminică, 12 septembrie 2010

Kittenz, Love, Music, Paris


Protectie de gel pe unghia naturala, fundal: glitter gel roz, scoici roz, miniholograme fuchsia si pictura cu tema : Love in Paris.

Protection of the natural nails with gel, background: pink glitter gel, pink shells, miniholograms fuchsia and painting with theme: Love in Paris.
Gel protecteur sur les ongles naturels,pour le fond: rose éclat gel, coquille rose, petit hologrammes fuchsia et du la peinture avec la thème: L`amour a Paris.


-details/ detalii-