vineri, 29 iulie 2011

Nail Shape : Square


Am realizat acest post cu gandul atat la tehnicieni, cat si la cliente si la voi toate, fetelor, ca sa va fac sa intelegeti cu usurinta ce forma de unghii vi se potriveste si DE CE. Sper sa va fie util!


Despre formele unghiilor false.. 


Forma unghiilor putem spune ca este cel mai important aspect al unghiilor – fie ele naturale sau unghii tehnice.
Intotdeauna forma si lungimea acestora trebuie sa se incadreze perfect cu mana si degetele clientei !
Tehnicianul de unghii este cel ce va poate sfatui cel mai bine in alegerea FORMEI PERFECTE ce se va potrivi totodata atat mainii cat si personalitatii voastre !
Am prezentat intr-o postare anterioara formele basic :


  • ALMOND
  • EDGE
  • OVAL 
  • PIPE
  • SQUARE
  • STILETTO
 Asa ca in continuare va voi prezenta fiecare forma in parte!


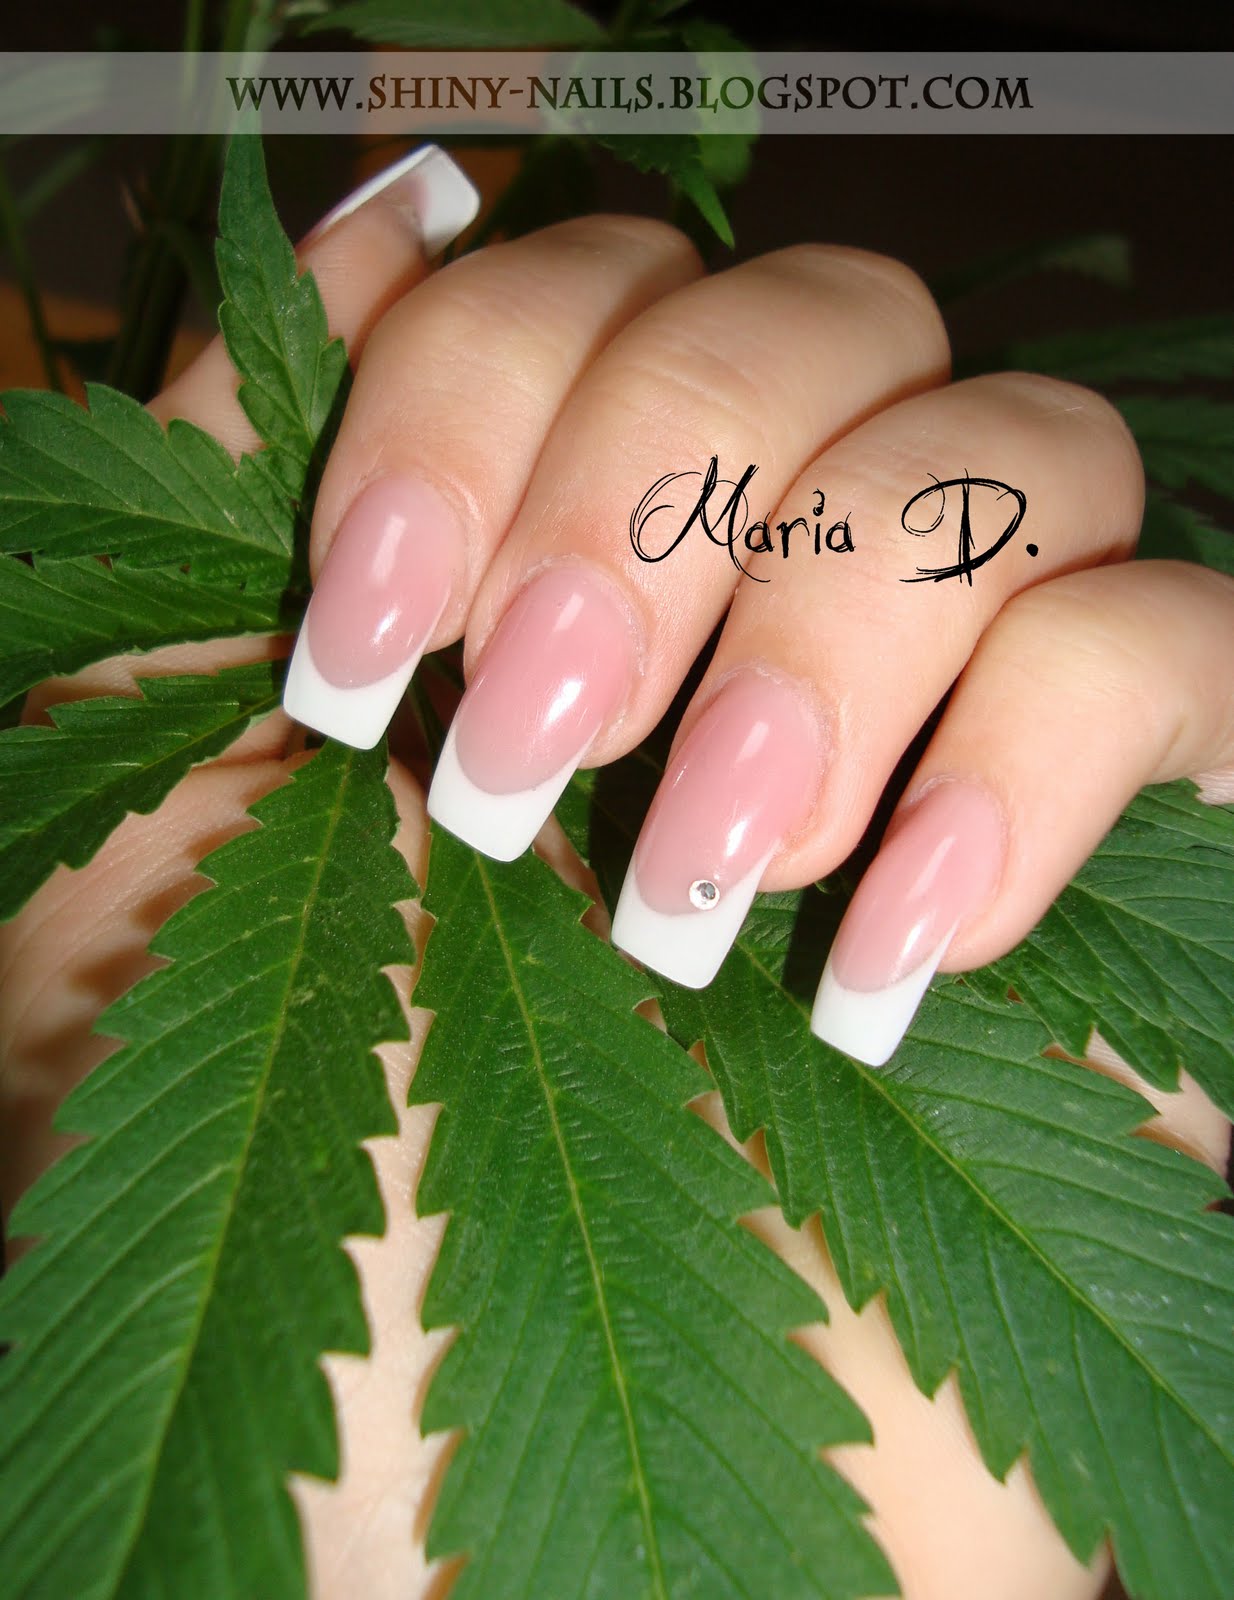
 Forma SQUARE / Unghii cu forma patrata


Cred ca forma unghiilor patrate este cea mai cunoscuta forma de unghii ( de altfel cea mai purtata forma in Romania ! ).
Femeile opteaza cel mai des pentru aceasta forma de unghii deoarece imaginea unghiilor patrate reprezinta « clasicul » si cel mai des sunt asociate cu french-ul alb sau culoarea rosie .
Atentie insa ! Nu tuturor persoanelor li se potriveste aceasta forma ! Regula se aplica in mod special persoanelor cu unghii cu patul unghial scurt ( unghii deteriorate) – in acest caz tehncianul trebuie sa opteze pentru tehnica prelungirii patului unghial cu un produs (gel sau acryl) cover (de acoperire) astfel incat unghiile sa dea impresia unui format mai lung. Astfel unghia va avea un aspect sanatos si ingrijit.

 TIPS : In cazul in care o clienta cu unghii foarte foarte scurte doreste o manichiura cu unghii false si opteaza pentru forma patrata, tehnicianul trebuie sa o indrume catre o lungime scurta catre medie, altfel unghiile acesteia nu vor arata deloc natural! Daca se opteaza pentru marimea medie si de exemplu pentru un french permanent, acesta trebuie construit cu grija, cu o linie smile/zambet foarte adanca, ale caror colturi sa ajunga pana la o treime a patului unghial.


 ATENTIE !
Unghiile patrate nu trebuie sa fie late si butucanoase ! Trebuie pilit cu grija si atentie astfel incat toate marginile libere sa fie perpendiculare intre ele, marginile laterle trebuie sa urmareasca exact linia unghiei naturale si sa nu fie mai late decat aceasta.


Daca dorim putem pastra colturile foarte ascutite, dar se pilesc pe dedesubt pentru a nu agata! Aici tine de gustul fiecareia in parte.


 Nota: Acest text reprezinta opinia mea personala vis-a-vis de formele unghiilor false.
Imi rezerv dreptul de autor pentru fotografii si text! Acestea nu pot fi copiate/ repostate fara acordul meu!


------------------------------------------------------------------------------------------------------------------------------------
I realized this post thinking about both the technicians and the customers!It`s a post for you all, to make you understand better and easily which form of nails suits you and WHY. I hope it will be useful!


About nail shapes...

We can say that the shape of the nail is the most important aspect of the nails whether they are natural or technical nails.

Always the shape and the length of the nails should fit perfectly with the customers hand and fingers !

Only the nail technician is the one who can advise you best in choosing the perfect nail shape that will fit both:  hands and also your personality!

I presented in a previous post the basic forms:
  • ALMOND
  • EDGE
  • OVAL
  • PIPE
  • SQUARE 
  • STILETTO
 So, I will present each shape separately!


SQUARE Nail Shape  
 

I think the square-shaped nails are the most famous between the nail shapes (most of the women in Romania are wearing square nails !).Women choose the square shape often, because it is the most common form of nail. The image of the square-shaped nails it is a "classic" one and most often associated with the French white or the red color.
But pay attention! This shape does not fit everyone`s fingernails and hands! This rule is applying especially for the persons with a short nail bed/deteriorated nails - in this case, the nail tech should do a prolongation of the nail bed with a cover product (gel or acryl), so the nails will have a longer aspect! These way the nail will seem more healthy and beautiful!

TIPS: If a customer with a very short nail bed wants a manicure with technical nails and she chooses for a square shape, the technician must guide her to go for a short to medium length, otherwise the nails will not look at all naturally! If she chooses a medium nail size and ( like an example) a permanent French,this must be built carefully, with a very deep smile line, whose corners go down to the third part of the nail bed.


WARNING! Square nails should not be broad and stumpy! They must be filed with attention, carefully, so that all free edges are perpendicular one to each other, the sides must follow the exact line of the natural nail and should not be wider than the natural nail.

If we want, we can let the corners sharp, but we will file the nails underneath so they will not pick up the fabrics. Each one with his taste.


Note: This text is my personal opinion about the nail shapes. I reserve the copyright of the photos and text! They may not be copied / re-posted without my permission!


joi, 28 iulie 2011

Garden Roses

Zilele trecute am gasit prin multele foldere cu unghii, un model pe care nu l-am postat! WOW! :)) Chiar nu stiu cum mi-a scapat! Le-am avut in paralele cu unghiile cu RObotzi
De maine voi incepe o serie de postari despre formele unghiilor tehnice! Sper sa aveti destula rabdare sa cititi si sa va fie util - va fi atat pentru tehnicieni, cat si pentru fetele ce poarta unghii tehnice - veti intelege ce forma de unghie vi se potriveste mai bine si de ce!


The other day I found through my many folders with nails, a design that I have not posted! WOW! :)) I really do not know how I missed it! I had those nails in parallel with RObotzi.
Tomorrow I will begin a series of posts about
nails shapes! I hope you have enough patience to read and it will be useful for you! - it will be for both technicians and for girls who are wearing technical nails - you  will understand what nail shape suits you best and why!


Extensii Stiletto cu gel, decorate in tehnica one-stroke realizate cu vopsele acrilice.
Extensions Stiletto with gel, decorated with one-stroke design made with acrylic paintings.


miercuri, 27 iulie 2011

Lazy Flowers


Today - Tips design! 

Acuarela / Watercolor free-hand painting / Aquarelle

marți, 26 iulie 2011

Step-by-step: Hawaii pedicure

Mi-am propus sa postez zilnic - aproape ca am reusit, dar tind sa cred ca m-am decalat cumva cu o zi :) M-am bucurat tare tare mult sa vad ca v-a placut pedichiura hawaii style! Ma bucur cand primesc feed-back de la voi - pozititv, cat si negativ - care cred ca m-ar ajuta si mai tare avand in vedere ca vreau sa schimb putin stilul blogului - vreau sa-l fac mai deschis - poate sa discutam pe baza modelelelor, sa imi puneti intrebari, eventual niste challenge-uri ca de exemplu sa reproduc step-by-step X design, sau orice orice altceva ce va trece prin cap legat de unghii si nail-art ! Imi puteti trimite astfel de cereri pe e-mailul afisat in dreapta! Eh, totusi sa revenim la postarea de astazi! 

I planed to post every day - I almost succeeded, but  I  think that I somehow delayed the posts with one day :) I am very very glad to see that you enjoyed very much the Hawaii Pedicure! I'm glad when I receive feedback from you - positive and negative - that I think would help me even more, since I want to change a little style of the blog - I want to make it more open - maybe we can discuss the designs, you can ask questions about the design, maybe challenge me (like an example to reproduce step-by-step the X design), or anything else you think it is related to nails and nail-art! You can send me this kind of request on my e-mail which is posted in the right section Eh, still go back to posting today!


Dupa cum spuneam, vazand ca v-a placut mult pedichiura, astazi va voi arata cum am realizat-o. Este si primul Step-by-Step de pedichiura, sper sa va fie util! Sa incepem ..
As I said, because you liked my pedicure, today I will show how to do it step-by-step. This one it`s my first step-by-step pedicure, so I hope you will find it useful! Let`s get started...


 Inainte am avut o pedichiura asortata cu unghiile Edge Aquamarin, pe care, sincer, nu stiu din ce motiv nu am postat-o.     
Pasul 1: Dezinfectam mainile noaste ( ale tehnicianului ) si unghiile pe care urmeaza sa lucram. Incepem sa indepartam modelul cu o pila electrica.

Before this pedicure, I had one which was matching with Aquamarine Edge Nails, which, frankly, I don`t know for what reason I didn`t posted it.
Step 1 : Disinfect our hands ( hands of the technician) and the nails which are going to work on. We start removing the old design with an electric file.


Pasul 2: Pregatiti unghia naturala : Degresare prin pilire usoara– Inlaturati praful – Aplicati primer.
Pasul 3 : Aplicati gelul de baza. Uscati-l in lampa UV. Degresati cu cleaner. Matuiti cu un buffer fin.
Step 2 : Prepare the natural nail :  File the natural nail – Clean the dust – Apply  primer.
Step 3 : Apply base gel . Cure in UV lamp. Wipe with cleanser. File gently whit a buffer.


Pasul 4 : Realizam din vopsea acrylica ( galben, oranj, oranj sidefat, rosu) fundalul in degrade prin tamponarea vopselei acrilice cu un burete. Avand in vedere ca a fost pedichiura mea, nu m-am sfiit sa tamponez culoarea peste tot - bine ca nu am ajuns pana la genunchi cu vopseaua :)) Chiar si atunci cand lucrez pe clienta, este invitabil sa nu depasesc cu vopseaua pe piele, dar nu va faceti griji, se curata cu cleaner sau cu apa si sapun.
Pasul 5: Asteptati sa se usuce vopseaua .
Step 4 : Realize with acrylic paint (yellow, orange, pearl orange, red) gradient background by dabbing with a sponge. Since it was my pedicure, I did not hesitate to dab the color everywhere - it`s a good thing I didn`t reached my knees with the paint :)) Even when I`m working on the customers, is invited to paint the skin - but do not worry, it takes out with cleaner or soap and water.
Step 5 : Wait for the paint to dry out.


Pasul 6 : Aplicati gelul de constructie. Eu am aplicat cativa fulgi de gheata - puteti aplica glitter sau aplte aplicatii, dupa preferinte. Uscati in lampa UV. Stergeti cu cleanser - si iata unghiile ceva mai curate!
Pasul 7:  Piliti cu o pila de granulatie 100/100 pentru a da forma unghiilor iar la final matuiti cu un buffer.
Step 6: Apply the construction gel. I applied some Mylar, but you can put in the gel glitter,or whatever you like! Cure in UV lamp. Wipe with cleanser - and now you can see the nails almost...clean.
Step 7: File (100/100 grain) to give final shape to the nails, and after file gently with a buffer.

Pasul 8 : Pictati cu vopsea acrilica un soare, palmieri si pasari. Pentru a sugera nisipul, am folosit acuarele negru-ocru-maron . Lasati sa se usuce.
Step 8 : Paint with acrylic paint the sun, palm trees and the birds. Because I wanted to suggest the sand, I used watercolor paint black-brown. Leave it to dry.


Pasul 9: Dupa uscare, aplicati finish gel. Uscati in lampa UV. Aplicati ulei de cuticule.
Step 9: After the paint dries, apply finish gel. Cure in UV lamp. Apply cuticle oil.


Si iata pedichiura terminata!
And here is the pedicure finished!


duminică, 24 iulie 2011

Hawii Pedicure

(click to enlarge / click pentru a mari)


Pedichiura cu gel, design realizat cu vopsele acrylice si insertie de fulgi de gheata.
Gel pedicure, design free-hand painted with acrylic colors and Mylar insertion.


Atunci cand am vazut pedichiura realizata de Kory (click aici pentru a o vedea) m-am gandit ca a trecut ceva vreme de cand nu am mai realizat o mani/pedi in stil "Hot Rod" asa ca, vazand-o m-am simtit inspirata si totodata motivata. Sper ca va place si maine va arat si cum am realizat-o!

When I saw the pedicure done by Kory (click here to see it) I thought it's been a while since I didn`t made ​​a Mani / Pedi in "Hot Rod" style. So, seeing her I felt inspired and motivated also. I hope you enjoy it and tomorrow I will show how I made ​​it!


P.S. : Thank you, Kory for the inspiration !!! :)

sâmbătă, 23 iulie 2011

Pink flowers


Acuarela / Watercolor free-hand painting / Aquarelle

vineri, 22 iulie 2011

Yellow rose


Acuarela / Watercolor free-hand painting / Aquarelle

joi, 21 iulie 2011

Hawaii Landscape


Acuarela / Watercolor free-hand painting / Aquarelle

Peisaj Hawaii / Hawaii Landscape

miercuri, 20 iulie 2011

Poppies


Acuarela / Watercolor free-hand painting / Aquarelle 
Papaver / Mac / Poppy / Pavot

marți, 19 iulie 2011

Afro


Mixed- Media :
Acuarela si vopsea acrilica / Watercolor and acrilic paint free-hand  / Aquarelleet acrylic painture

luni, 18 iulie 2011

Hibiscus Blossom

 
Acuarela / Watercolor free-hand painting / Aquarelle

Back to flowers :D  Enjoy!

duminică, 17 iulie 2011

Journey...


Acuarela / Watercolor free-hand painting / Aquarelle 
M-am gandit ca, daca tot suntem in vacanta, sa fac o mica pauza de la rutina zilnica de pictat  FLORI si sa ies putin din tipare...asa ca astazi vrea sa va prezint o pictura in acuarela, cu vaporase pe mare...sper sa va placa!

Because it`s holiday....I thought that I should take a break from my usual routine: painting FLOWERS and I would like to present you a watercolor hand-painted tips - ships on sea - hope you like it!

sâmbătă, 16 iulie 2011

Mega ICECREAAAAAAAAAM


Acuarela / Watercolor free-hand painting / Aquarelle
Something sweet just for you!


And because yesterday I painted the Ice cream nail design, today I ate a reeeeeeeeeeeeeeally good one  :)) .
Droool... :)) I`m still drooling :))

vineri, 15 iulie 2011

Nail classes with Újvári Barbara

De cateva zile, mi-am propus sa postez zilnic pe blog - maxim la 2 zile (daca nu voi avea acces la internet/ voi fi prea obosita, etc). Pana acum am reusit si sper sa ma tin de treaba si sa va surprind cu ceva nou zilnic. 

Weekendul trecut am participat la doua cursuri de nail-art in Belgia. 
  • Curs Acryl Art - LVL. 1 - 09.07.2011 
  • Curs Tehnica picturii in acuarela / Watercolor  painting/ Aquarelle technique  - 10.07.2011
Ambele cursuri sustinute de campioana Újvári Barbara. A fost o experienta minunata - am invatat multe "trucuri" noi si elemente de tehnica importante! Personal, m-am indragostit de tehnica acuarelei -  de cateva zile nu mai las pensulele cele noi si acuarelele din mana :)) ceea ce nu este un lucru rau.


From a couple of days I proposed to myself to post once a day - maximum once to days  if I will not have internet acces/ i will be to tired, etc. Until now I succeded and I hope I`ll do a great job from now on - in order to surprise you daily with something new.
Last weekend I took two nail-classes of Nail Art in Belgium:
  • Course Acryl Art - LVL. 1 - 09.07.2011 
  • Course Watercolor  painting/ Aquarelle technique  - 10.07.2011
Both of the nail classes were thought by Újvári Barbara. It was a wonderful experience - I learned lots of new "tricks" and very important new technical "elements". Personally, I am in love with watercolor technique - I can not leave away from my hands my new brushes and watercolors :)) witch is not at all a bad thing :)


 Acryl Course / Curs Acryl Art - LVL. 1 - 09.07.2011


Curs Tehnica picturii in acuarela / Watercolor  painting/ Aquarelle technique  - 10.07.2011


 Maria D. and Újvári Barbara


Újvári Barbara, Újvári Krisztina and group! Don`t laugh of my face :)) I was extremely tired :))  ( tired but happy! )


Tot ce pot spune dupa ce am absolvit acest curs este ca am invatat foarte multe si ca am si mai mult de exersat.
After this course I can only tell that i learned many many things and I have to practice a lot!

joi, 14 iulie 2011

Classic french


Extensii square cu gel pe tips, prelungirea patului unghial, french permanent din gel alb si tips cu un mini-cristal Swarovski.

Nail enhancement - square - tips with gel, extension of the nail bed, permanent french (white gel) and one mini Swarovski crystal.

miercuri, 13 iulie 2011

Drama Queen


Extensii cu gel - forma ovala - fundal de tip "aquarium" realizat din holograme mici-albastre, holograme mari turquoise-lila, glitter verde, glitter turquoise, glitter lila si pictura cu vopsea acrilica neagra.

Nail gel enhancement - oval shape - "aquarium" background made with little holograms blue, big holograms turquoise- light purple, green,light purple and turquoise glitter, painted with black acrylic paint.


Step-by-step : Drama Queen - maintanance and design

Salutare! Am revenit cu un step-by-step proaspat :) . Am pornit cu o intretinere a unei constructii de unghiute french cu gel ce au fost facute acum trei saptamani - o luna. Designul unghiilor noi este unul modern (de noapte, putem spune), cu reflexe multiple, divers colorate. Sper sa va placa si sa va fie util! Astept feedback! (pareri, cereri de noi modele sau intrebari legate de unghiute!)

Hello! I am back with a fresh step-by-step! I started with the maintenance of an old construction of french nails ( 3weeks-1month old). The new design it`s modern, made for clubbing ^^ , with multiple reflections and differently colored. I hope you like it and you find it useful! Waiting for feedback - opinions, questions, or design requests .


Modelul vechi -Dezinfectam mainile si incepem prin a pili .
Old design - Disinfect the hands and start filing.


Pasul 1: Pregatiti unghia naturala : Dezinfectare – Degresare prin pilire a gelului vechi – Inlaturati praful – Aplicati primer.
Step 1 : Prepare the natural nail : Disinfect – File the natural nail of old gel – Clean the dust – Apply  primer.


Pasul 2 : Aplicati gelul de baza. Uscati-l in lampa UV.
Step 2 : Apply base gel . Cure in UV lamp. 


Pasul 3 : Aplicati un strat foarte subtire de gel UV si fixati elementele/aplicatiile de nail-art (flitter, glitter,etc - am folosit holograme mici-albastre, holograme mari turquoise-lila, glitter verde, glitter turquoise, glitter lila) . Uscati in lampa UV.
Step 3 :  Apply a  thin layer of UV gel and fix the nail-art elements ( for this design I used: little holograms blue, big holograms turquoise- light purple, green,light purple and turquoise glitter). Cure in UV lamp.


Pasul 4 : Aplicati gelul de constructie. Uscati in lampa UV. Stergeti cu cleanser.
Pasul 5:  Piliti cu o pila de granulatie 100/100 pentru a da forma unghiilor iar la final matuiti cu un buffer.
Step 4 : Apply the construction gel. Cure in UV lamp. Wipe with cleanser.
Step 5: File (100/100 grain) to give final shape to the nails, and after file gently with a buffer.


 Pasul 6 : Pictati cu vopsea acrilica motivele abstracte. In acest design am acoperit majoritatea suprafetei unghiei cu vopsea si am lasat locuri goale acolo unde reflexiile glitter-gelului sunt mai puternice si diverse, pentru un efect spectacular.
Step 6 : Paint with acrylic colors the abstract motifs. In this design, I covered almost all the nail surface with paint and I let empty places where the reflections of the glitter gel are more stronger and diversify, for a spectacular look. 


 Pasul 7 : Dupa uscare, aplicati finish gel sau un gel trifazic pentru a fi sigure ca gelul nu va crapa. Uscati in lampa UV . Aplicati ulei de cuticule si eventual o crema hidratanta de maini.
Step 7 : After the paint dries, apply finish gel or a 3in1 gel just to be sure that the gel will not crack. Cure in UV lamp. Apply cuticle oil and eventually a hand cream .